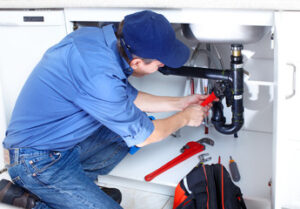
Orillia Plumbers work in many environments, including residential and commercial buildings. They are often on call to address urgent issues like leaks or severe clogs.
Their work contributes to society by ensuring that water supply lines, waste systems, and plumbing fixtures function properly. This profession offers a challenge for individuals who enjoy working with their hands and solving problems.
Whether they’re installing kitchen sinks, toilets, or dishwashers, plumbers are responsible for the pipes that bring freshwater in and carry waste water out. They use their knowledge of building codes and regulations, blueprint reading, and other technical skills to create plumbing systems that are safe and functional. This work can include laying pipes, connecting fixtures, and testing for leaks. Most plumbers complete an apprenticeship, which lasts from four to five years and includes classroom instruction and paid on-the-job training.
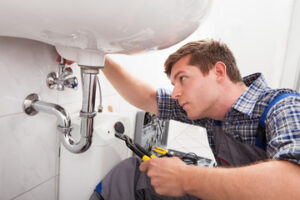
Plumbers also provide maintenance and repair services for existing plumbing systems. This work can include fixing leaking faucets and toilets, unclogging drains, or removing and replacing worn-out parts. Many plumbers also inspect sewer systems and make repairs as needed. This is a vital job, as malfunctioning plumbing can lead to contamination of drinking water and hazardous materials seepage into residential and commercial buildings.
When people think of plumbers, they often picture someone fixing a clogged toilet or leaking pipe in their home. While this is a major part of what plumbers do, their work goes much further. In fact, plumbers are responsible for installing the water and sewage systems that serve entire communities. This means that they are involved in the construction of hospitals, schools, office buildings, and even power plants.
Many plumbers specialize in particular types of plumbing systems. For example, some plumbers only work on residential systems while others focus solely on commercial or industrial ones. Each of these environments presents its own set of challenges and requires unique tools and skills.
For example, a residential plumber may have to work with tight spaces and small diameter pipes while a commercial or industrial plumber will likely deal with larger-scale water and sewage systems that must be connected to large machinery.
In addition to working in cramped spaces, plumbers are often on-call and must be ready to respond to emergency calls at any time. This can mean rushing out to fix a burst pipe in the middle of the night or responding to an urgent call about contaminated water. As a result, this type of work can be physically demanding and stressful. However, it can also be very rewarding for those who enjoy problem-solving and working with their hands.
Customer Service
A plumber’s primary duty is to fix plumbing issues for their customers. This includes performing comprehensive diagnostics and expert repairs, as well as advising their clients on preventative measures to minimize future problems. Providing excellent customer service can help to build trust, encourage repeat business, and increase a plumber’s overall profits.
In addition to repairing plumbing systems, plumbers may also install and maintain drainage, waste, and gas piping. This work requires attention to detail and knowledge of local codes and regulations. It is important for plumbers to carefully assess each job before beginning work, and to always double-check their work for accuracy and compliance with applicable laws. Additionally, plumbers should strive to provide high-quality work while remaining cost-effective and efficient.
Plumbers often receive a variety of benefits, including medical, dental, and vision insurance, as well as vacation time. However, the exact benefits that plumbers receive will depend on their employer and the type of work they do. Many plumbers also choose to start their own businesses, which can offer increased flexibility and a higher income potential.
The demand for plumbers is high, and they play an essential role in the health and safety of society. They ensure that homes and businesses have functioning water and waste systems, and help to keep the environment clean by reducing the amount of waste that is sent to landfills. In addition, plumbers can enjoy a sense of satisfaction from their work, knowing that they are helping people in a time of need.
Choosing to become a plumber is a smart career move. This is a hands-on profession that offers great pay and good job security, as well as the opportunity to make a difference in people’s lives. Although there are some risks associated with the occupation, such as exposure to extreme weather conditions, a qualified plumber can mitigate these by following safety protocols and using appropriate personal protective equipment. In addition, a plumber should always stay up-to-date on the latest technology and techniques in order to improve their performance and deliver a better service to their customers.
Collaboration with Other Professionals
When it comes to building a home extension or installing kitchen appliances, plumbers often work with electricians and carpenters to ensure that all systems integrate seamlessly. This collaboration requires strong communication and teamwork to resolve any issues that may arise. Plumbers also work with engineers, architects and contractors on new construction projects to ensure that plumbing systems meet all necessary codes and specifications.
While on the job, plumbers must adhere to strict safety protocols when handling equipment and working in tight spaces. As such, apprentices are taught how to properly use and operate tools and equipment during training programs, as well as in on-the-job experiences. Apprentices are also required to attend regular safety meetings to learn about industry best practices and ongoing changes in regulatory requirements.
Due to the nature of their responsibilities, plumbers must be available around the clock to respond to emergency situations. This can include clogged drains, flooding, and water heater failure. Plumbers are also responsible for conducting routine inspections of pipes and fixtures to identify any potential problems, such as a leak or clog, and take proactive measures to address them before they become worse.
The plumbing industry is a highly specialized field, and plumbers are required to have in-depth knowledge of a wide range of systems and components. In addition to their technical skills, plumbers must be able to think critically and solve complex problems on the fly. They also must be able to work well under pressure and meet deadlines.
For example, if an older home’s plumbing system is outdated and inefficient, the plumber must be able to suggest and implement solutions that are both cost-effective and environmentally friendly. This may involve recommending and installing low-flow toilets or rainwater harvesting systems to reduce water waste without sacrificing functionality. In addition, a plumber may be responsible for connecting gas lines to appliances such as water heaters and stoves. This work requires extensive knowledge of plumbing codes and regulations to ensure the safety of all residents.
Safety
Whether performing simple tasks like unclogging toilets or more complicated repairs, plumbers must have an excellent sense of awareness of their surroundings at all times. They must be on the lookout for tripping hazards and other potential problems, such as wires that are exposed, uneven floors or poorly marked areas. Additionally, some of the work performed by plumbers requires them to be in confined spaces such as crawlspaces or attics. Working in these cramped spaces can increase the risk of life-threatening accidents, and it’s crucial that plumbers take all necessary precautions.
When working with hazardous materials, plumbers must also follow proper safety protocols. This includes reading and understanding Material Safety Data Sheets for chemicals they use, ensuring that any equipment used is properly ventilated when soldering or using chemical solvents and wearing protective clothing when handling sewage or other potentially toxic substances. It’s also important that plumbers know how to shut off power and gas lines safely in case of an emergency, and that they’re familiar with all applicable OSHA standards for their particular job site.
Cluttered work areas are a common cause of trip and fall hazards for plumbers, so it’s important that they keep their tools and materials organized at the beginning and end of each shift. In addition, plumbers should make sure that their work area is well-lit and clear of any other obstructions. Lastly, plumbers should always be aware of the temperature in their work area and wear appropriate clothing for the season.
Plumbing repair can often involve dealing with heavy loads, so it’s crucial that plumbers prioritize proper lifting techniques to prevent back injuries. This includes taking frequent breaks to stretch and avoiding lifting anything that’s too heavy. It’s also important that plumbers use the right amount of support when lifting, and that they utilize a team-lifting strategy for any awkward or heavy objects.
Keeping up with training and ongoing education is a vital part of any career, but it’s particularly important for plumbers. By regularly attending professional development courses, plumbers can ensure that they’re familiar with the latest safety standards and can effectively handle any job they’re assigned. This is a great way to reduce the risk of injury and create a safer working environment.